June 25, 2012

Chocolate Chip Zucchini Brownies + NEW Waxed Paper Sacks...

It's that time of year again when the zucchinis start to pile up everywhere. I always like to try a few new recipes each Summer and Pinterest was the first place I looked. I found a very intriguing recipe called Chocolate Chip Zucchini Brownies so I pinned it. The original recipe is from this post at Food Plus Words blog, a fun new blog find. And shortly after, I tried the recipe. There's something about baking that always takes me right back to my mom's kitchen. Maybe that's why items from my kitchen (shown below) look like they're from another era. I love all the old time dishes and utensils.
I knew I wanted to use these brownies for some gifts so I wanted them to cut perfectly. I lined my baking stone pan with foil and then sprayed it with *Spam* as Jordan calls it....Pam baking spray actually.
Then I just lifted the little tin foil handles and out came my brownie brick.
But they were far from bricks when it came to the texture. These babies were soft and moist and tasted really good. And chocolate-y. No taste of zucchini what so ever. That only adds to the moistness. Note: I ended up wrapping the brownies in clear wrap and freezing them for future use. I found that they were SO moist that they might end up sticking to my packaging.
I did a little photo shoot with my brownies and a half pint of milk + an old plate. I had a little idea brewing for a fun tag to add to a new product that's coming up in just a bit. I used Instagram and Phonto apps on my iPhone to alter my photo, which will be used for my packaging.
And now I'd like to introduce a new product that I'll be carrying in my shop. Waxed Paper Sacks are my newest packaging item that I'll be adding to my product line up. They will be sold in a set of 10 and will be perfect for food packaging or just for fun packaging of small gifts. I absolutely love the Kraft color and the crinkly feel. There is about a 1" gusset on the sides so they can be filled with lots of treats and goodies. I think these will take you back instantly to the days your mom packed your lunch and wrapped everything in waxed paper. Anybody with me on that one, or was it Ziplocs all the way for you?
I'll be using the Waxed Paper Sacks frequently I'm sure for teacher gifts, etc so you'll be getting lots of inspiration. I'll probably offer some kits up in the shop too, using the sacks, tags + other shop items. Today I have a fun packaging to share for the Chocolate Chip Zucchini Brownies. I grabbed a few out of the freezer and let them thaw. Meanwhile here's the line up of products that I'll be using to create my treat gift sacks.

Products used:
Cotton Twine
Washi Tape
Instagram photo (printed at 2" x 2" with a white border)
Studio Calico paper clip stamp from Please Note Stamp
Directions to create tag:
Type to/from on Grid Paper Label with vintage typewriter. Adhere label and photo to Large Manila Parcel Tag. Adhere strip of torn Washi tape to tag and stitch over with sewing machine. Stamp the paper clip over the top edge of the tag. Fold over Waxed Paper Sack, filled with treat, and punch hole. Tie embellished tag to sack with cotton twine. Be sure to leave the tails of the bow long. Love that look.
And that's it. A fabulous homemade treat, simple handmade packaging and you look like a domestic piece of loveliness.
Thanks for stopping by. I hope you enjoyed today's post. You'll be seeing lots more homespun creations using my shop items + favorite products.

June 23, 2012

Project Life Week 20, 2012...using #'s, photo collages, & small sacks

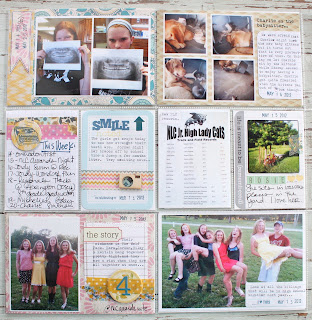
Back today with Week 20 of my Project Life 2012. This week I'm focusing on using mainly one paper line from My Mind's Eye, using printed photo collages, and using small sacks from my shop to hold extra journaling.

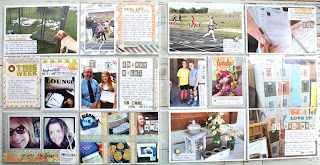
Here's my 2 page spread. I'll be coming back to this week later on to add in some inserts for Jordan's graduation festivities and the last week of school.
The left page.
The right page.
I had just received a new batch of My Mind's Eye goodies from 2Peas so I decided to use mostly those papers, twine and embellishments on this week's spread. It's so easy to coordinate everything when you just reach for a few items that you know will mix and match easily.

Here, the girls had an orthodontist appointment. The x-rays were taken to see how straight the girls' teeth and roots are at this point. Looking good to have the braces off by early Fall.
Here I used an app on my Iphone called Pic Collage that Josey installed for me because she thought I might like it. You can add in a ton of photos, choose a background and create all kinds of collages. Not real high tech but it was kind of fun to mess with it while I was waiting for the girls at a practice one afternoon. A fun thing about this app is that it looks like you can send the collage as a postcard to anywhere in the world. Instant Christmas cards this year, maybe so?? What I liked about this collage for my Project Life is that it prints as a single photo with no layers involved. That's important when you want to keep the bulk down in your albums. I just added some typed journaling on a Project Life grid card. The title on the background was created within the app.
Here I used an Elle's Studio journaling card to add some typed journaling. I also reached for a chipboard circle that I adhered to my 4 x 6 insert with Washi tape. An easy way to adhere dimensional accents. I added a #4 sticker to the top of my Washi. You'll notice that I used #'s this week as a source of repetition. I'll point those out on the other inserts. Something about #'s that seem to make you want to read more.
Lately I've been adding 3 x 4 photos to the journaling insert slots. This means that it takes away that journaling area for the corresponding 4 x 6 photo slot. I've remedied this by adding only 1 small photo to the 4 x 6 slot and then use the other half for journaling. Here I used a grid sack from my shop with a large manila parcel tag inserted into the sack for journaling. Then I had room to add yet another photo on top of the sack.
Here you can see the tag insert that I still need to add journaling to. I added date stamp, some washi tape and some stitching to the tag. I did have to trim down the sack so I just stitched the bottom shut. I also trimmed the large manila tag. I'll definitely be using this idea more so that I can scrunch in as many photos and details as possible.
Here I used a die cut that was stamped with Studio Calico stamps. I used Papertrey numbers....again with the numbers....on the insert that shows it's my 43rd birthday on this day. I stitched right over the numbers with my sewing machine.
And here are my 3 x 4 inserts. On the very left I have my Week in Review slot. I stamped a typewriter then added MME paper and Washi tape. I still love using my Bic Markits to do some larger hand journaling. On the right I used a smile stamp from Studio Calico, an arrow that comes with the Project Life core kits, washi tape, and a Studio Calico wood veneer camera. This insert coordinates with the photos of the girls at the orthodontist.
Here I have a photo of a large poster at school that shows track records for the school. You'll be surprised at how much small detail you can add without adding in big inserts. On the right I have an Instagram of Rosie, my red bicycle.
On the left here I have another Instagram of some new/old porch pillows I scored at the thrift shop. On the right I have a photo that shows the day my new/old lockers came home. The unit was parked right where my husband parks so I made a little sidewalk chalk love. And a peace sign in the shadow. :)
More photos from the week....the last time the girls rode the bus, knowing that next year Josey will be driving both of them to school. And a photo of Charlie at 8 months old. I used a # again on top of some Washi tape.
And there's another week down in the books. I seem to continually be about 3-4 weeks behind on my album but I'm perfectly okay with that. I've been using my calendar to document the photos and details so it's all there waiting for me. I'm looking forward to going back and printing off the photos I want to add as inserts. I've made sticky notes and keep them with the corresponding week so it should be an easy task when I get time.

Thanks for stopping by! We've got a ball tournament all weekend long...but I really look forward to getting back into my craft room to purge, reorganize and bring in some of my new auction finds. I'll be blogging about that fun night soon!

June 22, 2012

Project Life Week 19, 2012...featuring 6 x8 photos & notebook paper labels

Back today with Week 19 of my Project Life. Today I'll be sharing a fun 6 x8 insert + focusing on my new Notebook Paper Labels.  

Here's my 2 page spread.  Still in school but wrapping up the activities for track, awards nights, Mother's Day and Jordan's graduation.  I've got a few inserts to add but those will have to wait til later.  
The left page.
The right page with the giant 6 x 8 photo of my new/old lockers.
Here's some closeups of the 4 x 6 inserts.  I used a photo of Charlie after he tore up a chair mat we left in his outdoor pen.  He hates staying in there and rebelled by tearing up the mat.  If you zoom in, he's even sticking out his tongue in the photo.  I typed my journaling on a Notebook Paper Label.  These are in addition to my Grid Paper Labels that I have in the shop.  What I love about these labels is that I can add the journaling right to my photo without having to add in a coordinating 3 x 4 card.  This has allowed for lots more photos to be added to my album.  I also added my weekly date to a little hand cut flag made from white woodgrain cardstock.
Here I used a Project Life journaling card that I typed on to a 4 x 6 layout.  I used some Washi tape at the bottom along with a Studio Calico wood veneer arrow.
2 photos after a recent hair cut.  I love to use my White Garment Tags when I have photos that relate to size, style, price, etc.  I typed on the tag by first adhering it to a large piece of typing paper and then running it through my typewriter.  I then added a date stamp.
Another Notebook Paper Grid Label that I ran through my typewriter and then stamped with a Studio Calico stamp.
This is a 6 x 8 photo with white border.  I just chose the size I wanted in my printer settings.  I cut the photo in half and then cut the top two portions in half again.  This fills up (1)-4 x6 insert and (2)-3 x 4 inserts.  I saw Kelly Purkey use this on one of her Project Life inserts and thought it was so clever.  I added more typed labels, letter stickers and Washi tape to the 4 x 6 photo insert.  I love the title of *storage wars* for this photo because I took a lot of slack about my new/old lockers.  Everyone around here thought they were ugly and asked when I was going to paint them.  But my design friends all assured me that they were just right.  Thanks girls.  :)
Here's the 3 x 4 inserts.  I used a Small Parcel Tag with stamping and Washi tape and adhered it to a Project Life journaling card. On the right I used the bottom portion of a 1 2 x 12 piece of patterned paper...the strip that has the company information.  I thought the Take Note name was fun to use.  I stamped over it with various Studio Calico stamps.
Awards Night for Josey along with some typewriter journaling and letter stickers.  I also used some word stickers along the side of the card.
A photo of Josey with a track friend and a Project Life journaling card, fancied up with a stamped circle and Washi tape.
And that's it for this week.  Thanks for stopping by.

Coming soon:
Cute new packaging for food and small gift items + a recipe for all those zucchini you may acquire this Summer.  New Washi tape too.

More Project Life updates + a "half way through the year" encouragement post.  

A night at the old school auction + what I brought home with me.  

More Summer Cottage pages from my mini album.  

June 20, 2012

Handmade Project Life Journaling Cards...

I thought I'd never get to my computer today. I helped my dad pick 5 huge buckets of green beans this morning, then stemmed them, washed them, cut them and washed Mason jars in my dishwasher. My mom is now on canning duty so I have a break. Whew.

Today I have some handmade Project Life journaling cards to share. Lots, actually. I was inspired by Lisa Truesdell's post at 2Peas where she challenged us to make our own journaling cards. Lisa's involved stamping, which I had originally intended on doing, but I ended up leaving the stamping for later and just concentrated on adding patterned paper, stickers, tags, etc.

Here's my recap, I have lots to share. For this grouping I reached for some pre-made journaling cards. Some were from Project Life kits, some from Banana Fish Studio and some from Elle's Studio.
Especially love the grid paper and ledger designs. For all of my samples, I used a few new papers from my favorite companies but most of the papers came right out of my little scrap basket.
Here I added strips of patterned paper and lots of stitching. These are mixy matchy but I could easily grab a handful of these and they'd look great together.
These four are some favorites. I coordinated them all by stitching on a small strip of diagonal striped paper. Note: I used these four for a recent Project Life weekly spread and I love them! So quick and easy.
Here I reached for Studio Calico sticky pads. Tiny little sticky notes that I adhered, cut in half, or stitched on. Love how these turned out. I'll be able to add stamping or typewriter journaling or perhaps a date stamp so easily.
The quote bubbles will be perfect for noting who said what. I left a lot of the pieces without adhesive underneath. This way I can tuck a photo underneath easily.
Arrows and little squares.
And these fun label stickies. So fun! I do hope that Studio Calico makes more designs of these. *hint hint.
Here's the circle stickies. I used some whole and cut some in half.
Here I used lots of the small sacks from my shop. I find that these are perfect for tucking into the 3 x4 slots or side by side with a smaller photo on the 4 x 6 inserts.
Here's a close up of some tags I added from my shop, plus Washi tape, stickers, punches, etc.
Stickers to the rescue. We all have tons of these label stickers, right?
I cut a lot of them in half so I got double duty.
And just some random journaling cards using scrap paper, pieces of die cut images in my scrap try, tags from my shop, etc. I even found a piece of fabric that was fun to add in.
Lots of items from my shop work perfectly on the journaling cards. Tags and more tags, paper doilies, library cards and more.
These are some of my favorites, with a tag tucked under a strip of paper, cutting a tag in half, and I also used the bar code strip from a piece of Studio Calico paper. I thought it fit right in with the price tag.
I had a blast creating these journaling cards. They make for a great creative warm up exercise or perhaps you don't have time to do a full layout but you just want to piddle around. Try them out, you'll have so much fun. I used some from my first batch and man, what a time saver. I can't wait to make more.

Tip: Use scraps of patterned paper, die cuts, stickers etc.....however make sure the papers are current enough that you'll want to mix them in with your current layouts. If they're not, trash those scraps...or punch circles to create a fun garland for gift wrap, etc. Have fun!

June 18, 2012

Summer Cottage/Pieces of Me Mini Journal-Cover

Edited for questions:

The doily mask I used is by Christy Tomlinson for She Art, Pink Paislee.  I couldn't find a direct at 2 Peas but I think that's where I got it.  It's darling and I hope Christy makes more goodies for Pink Paislee.

For printing Instagrams at home, visit this link under my PAGES section on the left top side of my blog.  I've flagged some interesting Project Life tops there that you may want to check out.   

Today I'd like to share with you the beginnings of my Pieces of Me journal that I'll be working on this Summer.  I completed my cover, using items from my Summer Cottage Kit that was offered in my shop a while back.

Here's my front cover.  I'll be using the 4 x 8 woodgrain, chipboard Studio Calico album that I supplied in the Summer Cottage Kit.  
I chose lots of my favorite items to embellish the front cover, including Sassafras paper by Studio Calico, tags from my shop, some ribbon, a vintage button card, a badge, wood veneer hearts, a printed milk cap from Banana Fish Studio, a pretty doily mask, white Mister Huey's spray mist and a small Instagram photo.  I'll be sharing some of the supplies I use from the Summer Cottage kit + from my stash along the way.
These items reflect some of my favorite items to craft with....tags, grid prints, old vintage finds, floral and doily patterns, etc.  I punched holes in my album front and back and now it's ready to go.
In the Summer Cottage Kit, there were a handful of 4 x8 pages to get your album started.  Here I added in lots of other favorite papers from my stash.  The photo colors are off but I primarily am sticking with Kraft, summery yellows, peachy oranges, greys, grid type papers, robin's egg blue and olive greens.
Here's the beginnings of my album, assembled.  I know the rings look huge and kinda dorky here but just imagine this album full to the brim someday, chock full of favorite photos and memories.  I used the largest rings for the kit because I wanted this album to be really thick and chunky.  It's perfect for adding in those bulkier items like buttons, badges, chipboard pieces, found objects, etc.
Next up I'll be working on the first few pages of my album which will reflect on me. I'll include a few photos of me, some facts and describe what I want this album to be about.  Here's some of the supplies I'm thinking about using....
For the rest of my album, I'm planning on using square Instagram photos that I've been saving on my iPhone.  I'm just printing them off as I go and am going to keep a little basket full of photos that I can add here and there to my album.  

Thanks for stopping by and be sure to share links to your Pieces of Me album or your journal/projects you made using my Summer Cottage kit.  
Related Posts with Thumbnails